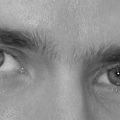
Professional photographer jargon calls strong, unnatural over-exposure “High key”. This is what we try to emulate in this Photoshop article by preparing a B&W high key version of a color image. The procedure is further spiced by leaving the eyes colored, so that the gaze and the color catch the viewer’s eyes.
Step 1: Load the photo in Photoshop

High key effect looks good mainly with portraits. It enhances the emphasis of the subject’s gaze while leaves the rest of the features less powerful. It is also suitable for facial skin smoothing. In order to emphasize the eyes, we’ll leave their color, or even enhance it.
Step 2: A bow

To create over-exposure, click Image/Adjustments/Curves. You can quickly specify lightness and contrast levels of the photo here. In two places, at approximately the thirds, click the diagonal line and drag the handles to bend the line as a bow. The settings shown in the illustration already produce a powerful effect, but of course the extent to be applied depends on the particular photo. You can fine-tune the picture by dragging the handles to very small distances. Lighten the image until fine details get whitened out but the main features of the face still remain recognizable.
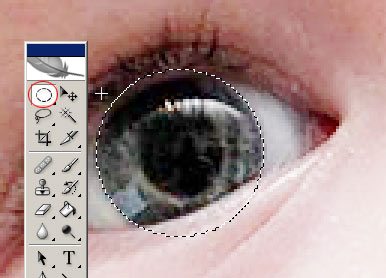
Step 3: The eye…
…color usually gets bleached along with other facial parts, or it may already lack saturation in the beginning, so you might need some post-coloring. This way, you can lend the eyes any color you like. We’ll keep the greenish-grey tint but boldly over-emphasize the greens. This won’t look natural, but we don’t want it to, anyway.
First, select the eyes with the elliptical selection tool. After selecting the first one, hold SHIFT and select the other, so that both will be selected and you can work with them at the same time. After the selection, right-click one of the eyes and click Feather in the context menu. Set Feather value to 3 to 5 pixels. By doing so, you soften the edges of the selection.
Step 4: The green-ey’d monster
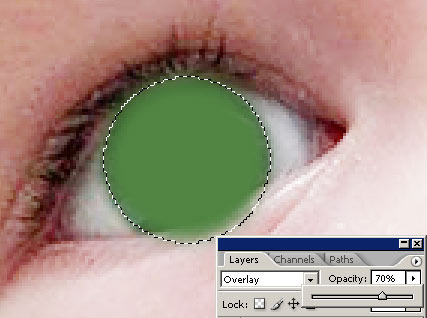
Click Layer/New/Layer to create a new layer for the eye color. Now choose a suitable foreground color. In this case, it will be a green hue. Click a selected area with the paint bucket tool to fill it with this color. For the time being, the subject looks like that “green-ey’d monster”, so select the Overlay blending mode on the Layers palette and decrease Opacity to make the green filling fit into the picture.
Step 5: Excess parts
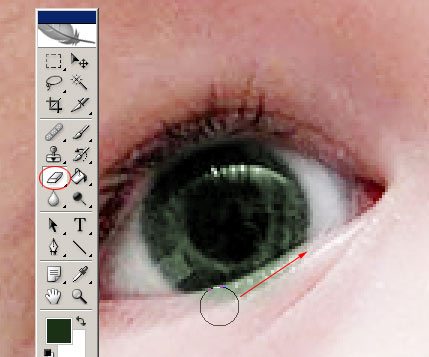
The green fill may not fit the shapes of the eyes perfectly and may also affect parts of the eyelids. Press CTRL+D to cancel the selection and use the Eraser tool (with a soft brush) to clear up any unwanted green areas.
Step 6: Baby gaze
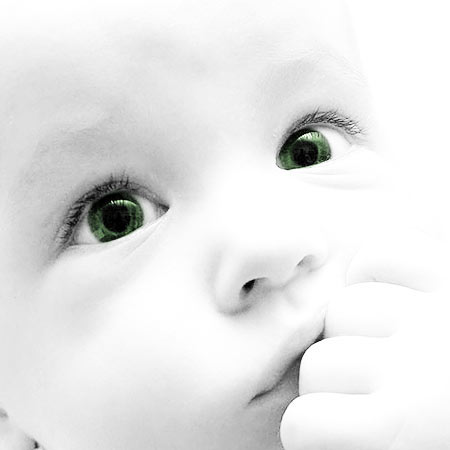
Finally select the layer containing the original picture on the Layers palette and click Image/Adjustments/Desaturate to make the colors of the image vanish, except for the greens on the upper layer, which will provide a startling—and effective, albeit excessive—eye color in the high key image.