An aesthetic trick often used in photography is the emphasis of the main theme against other areas of the picture by using a small depth of focus. An object or a face can spectacularly stand out against a blurred, homogeneous background. Owners of compact cameras might have already encountered the problem that, in the majority of their photos, everything is sharp. A small depth of focus and the blurring of the background is very difficult to achieve. Such machines have a very small sensor with a small focal distance lens, and therefore, a large depth of focus. Even with a larger camera, you might feel that a photo you have taken needs its background blurred. Our next Photoshop tip offers a solution for this problem.
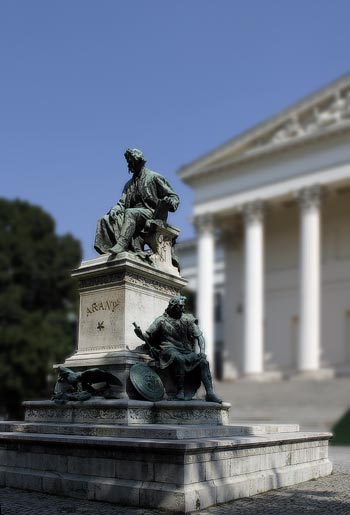
In the sample picture, depth of focus is large, and so all the details are sharp. We’d like to emphasize the monument in the foreground by blurring the background.

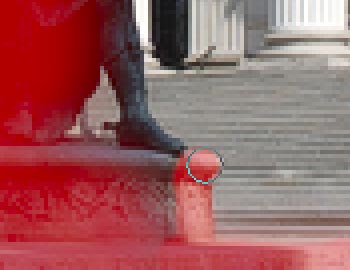
On the tools palette, change to Quick Mask mode by clicking the icon marked with a red circle. Nothing visible happens, but in this mode, you can use a properly configured brush to mask out the areas you want to leave sharp. Later changes will not affect the masked areas.Change to the Brush tool (press B), select a mid-sized brush (we have used a 45-pixel one), and carefully cover the areas you want to leave unchanged. By default, covered areas display with a red veil. This won’t affect the picture directly, only signals Photoshop which areas are not to be touched.
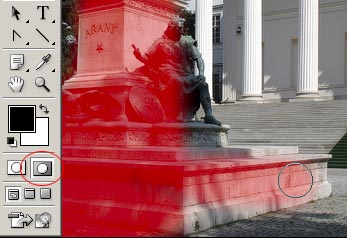
After the mid-sized brush, select a smaller one with a sharp edge, and cover the sensitive areas and the edges of the shape more carefully. Keep in mind that you should only cover the areas that you want to stay sharp. Paint the boundaries between the sharp and blurred areas with a sharp-edged brush! This requires a bit of dexterity and experience. In this example, we have used a 9-pixel sharp-edged brush, and a 5-pixel one for even smaller details. For more accurate work, enlarge the details of the photo on the Navigator palette. If you accidentally cover something you shouldn’t, press E to change to the eraser tool, and use a similar-sized eraser to undo the unwanted mask, and restart covering the area that needs it.
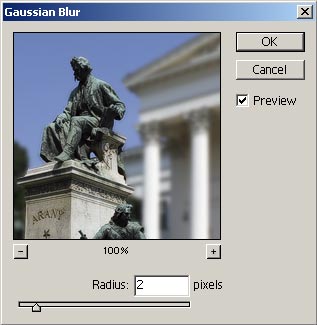
After finishing the mask, click the icon to the left of Quick Mask, or press Q to change back to Normal mode. The red veil disappears, and the uncovered areas become selected. Our next steps will only affect these areas.Click Filter/Blur/Gaussian Blur to blur the background. On the dialog, set a blur radius of 1 to 2 for wide-angle pictures (that is, if the picture contains a larger area). If the photo was taken with a teleobjective or contains only a smaller object or theme, you can use a larger blur. If you set a too large blur for a wide-angle photo, the result will look unnatural. You may do so if you wish but in such cases, a smaller blur produces more plausible results. We have used a radius value of 2, which is perhaps already on the borderline, but we wanted to underline the effect.
After applying the Blur effect, press Ctrl+D to remove the selection, and finally, save the image.