In the following article, we’ll be leveraging the features of the filter gallery introduced in Photoshop CS. The gallery allows you to easily apply multiple filter effects to the same layer, e.g. changing it into a lifelike drawing or painting. Users of earlier Photoshop versions can also try the procedure, but they will have to apply the filters to separate layer copies and merge them with a blending mode of their choice. So, Filter Gallery did not only speed up organizing creative filters, but also enhanced and made easier layer management.
Load the photo in Photoshop
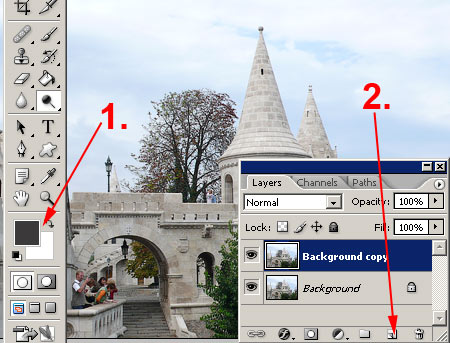
Right afterwards, choose an appropriate pencil color. You may want to select black or a dark grey hue in order to make the edges properly emphatic and the result look like color/coal pencil. Use this as foreground color, and leave the background white.
As the next step, duplicate the original layer by dragging it upon icon 2.
Poster edges
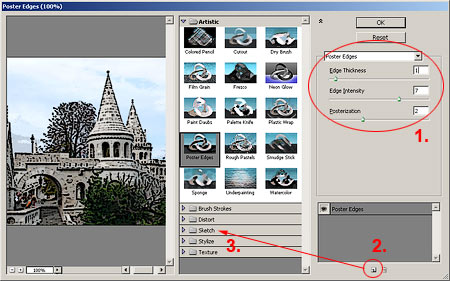
We’ll stay on the new layer to emphasize the edges in the picture as if they were inked out. Click Filter/Artistic/Poster Edges. The left side of the appearing dialog contains the preview image. The selected effects are in the middle, the options are on the right. You can set them according to the picture and your taste.
The first slider specifies Edge thickness, and the second, intensity, that is, inclusion of more and more edges into contour highlighting. The third slider sets the number of colors. In this case, it is unimportant. Set the contour thickness according to your taste. We chose a relatively thin line, but used a high intensity.
In the bottom right area, you can add a new filter to the existing one without closing the dialog, which means the two filters will affect the picture together. Click the left-side icon at the bottom, and from the Sketch menu in the middle, select Graphic Pen.
Pencil
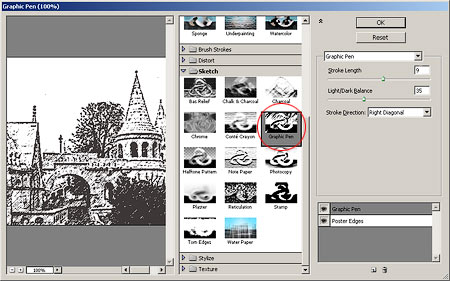
You’ll be seeing the dialog above. On the right side, you can specify options for the Graphic Pen filter. Once again, set them as you like. Stroke Length refers to the imitated pen strokes, and Light/Dark Balance controls the extent of the drawing effect in the picture. The last dropdown allows you to set the direction of pen strokes. We chose Right Diagonal.
When you’re done with the options, click the icon at the lower left again, and select an opposite direction (in this case, Left Diagonal) in the Stroke Direction dropdown, the stroking will be a bit more varied and lifelike.
It’s time to click OK.
If you want colors
The drawing is ready. If you just want a single-colored effect similar to pen or pencil drawing, you can stop here. For a little painting-like effect and some colors, read on!
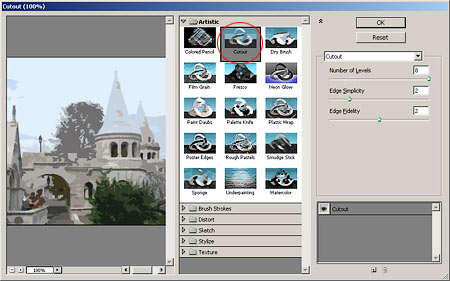
Click the original Background layer, hitherto untouched. We’ll be applying a small change to it, using the Filter/Artistic/Cutout feature. Set the first slider (Number of Levels) to a higher value, leaving more colors in the picture. Use a low value for the second one (Edge Simplicity) so that the shapes in the image will resemble their original forms to some degree.
Show through
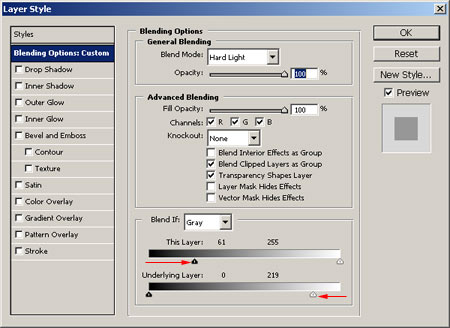
On the Layers palette, set the blending mode from Normal to Hard Light, and double-click the upper layer. The Layer Style dialog is displayed, where you can how the layers will show through. Drag the left arrow on the This Layer slider to the right to make the darker areas of the layer more transparent (which allows the colors of the layer below show through). Drag the right arrow on the Underlying Layer slider to the left for a similar effect the other way around, making the white areas more transparent. This regains some of the blue of the sky. You don’t need to make all of the layer transparent, and it is totally acceptable if colors show through in rough, unconnected spots as this adds a draft-like quality to the drawing or painting.
Show-through will be discussed in more detail next time.
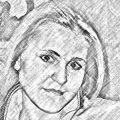
A drawn bastion
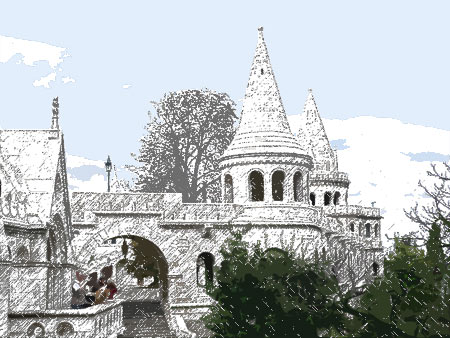
Here you are, the drawing/painting! The main edges show a draft-like pen drawing look with a slight shadowing, and in the larger continuous areas, such as the green foliage or the blue of the sky, some of the colors returned.
As a last step, click Layer/Flatten Image to merge the layers, and save the picture.