Architectural cameras and lenses often have a Swing or Tilt feature which tilts the focal plane and thus provides a weird depth-of-focus effect. Sometimes, primarily with landscapes or cityscapes photographed from above, you get the impression as if you were looking at a mock-up. Now we try to emulate this effect using Photoshop.
Load the photo in Photoshop
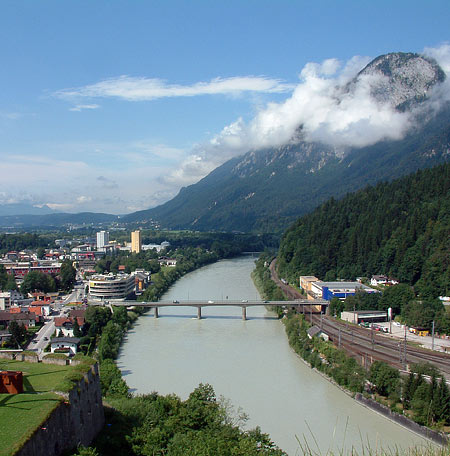
Choose a landscape or cityscape which shows buildings, people, objects from far away, and the angle of visibility is about 20 to 30 degrees. Once again: as if you were looking at a mock-up. It is a clean advantage if the main area you want to emphasize is around the lower trisecting line, like the bridge over the river in our photo. A good starting image makes up half of the success! Now, in order to get an even better result, you’ll only have to fiddle a bit with sharpness.
The parts you need
As mentioned above, we want to emphasize the bridge and its surroundings, and in order to do so, we’ll have to blur other areas.
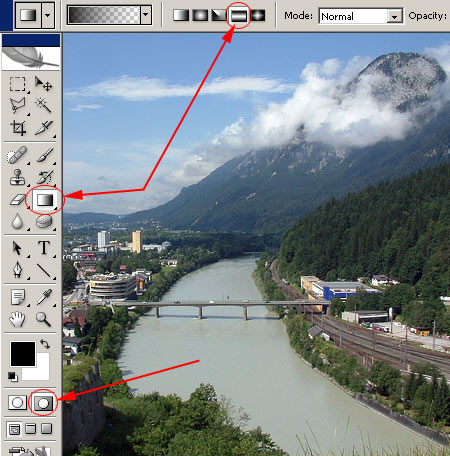
First, we have to prepare a mask to preserve the areas that need to remain sharp, and make blurred only the other parts. Quick Mask is a practical choice. Click the indicated icon at the bottom of the Tools palette, or Press Q to switch to Quick Mask mode. Now click the Gradient tool in the middle of the palette, and from the options displayed at the top, select Reflected Gradient.
Preparing a mask
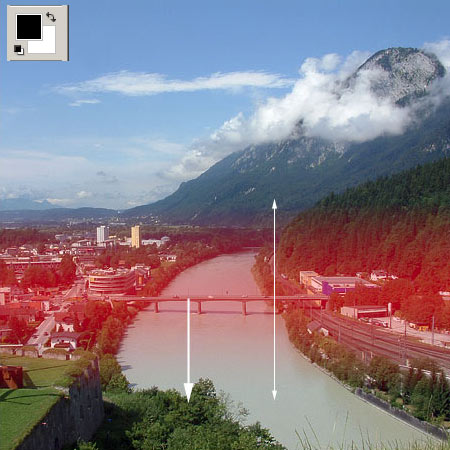
Now you’re ready to create the mask. Before you begin, make sure the primary and secondary (foreground and background) colors displayed at the bottom of the Tools palette are black and white, in this order.
In the example photo above, we clicked the middle of the bridge, and dragged the mouse to near the bottom of the screen while holding down Shift. You need to press Shift to draw an exactly vertical line without making the gradient skewed. After releasing the mouse button, the gradient mask will be shown in red, fading out. As it is mirrored horizontally, it will also fade out upwards, thus, in total, occupying twice the area you selected by dragging. This is the area that will remain unaffected by later changes.
If you’re done, press Q again to quit Quick Mask mode and get back to Edit mode. This will display a selection marquee outside the designated area, which means everything will be selected, save for the parts we masked out to preserve.
Lens Blur

Click Filter/Blur/Lens Blur to blur the unnecessary areas. As opposed to traditional blurring features, this one strives to emulate the background blur produced by photo lenses, and thus provides an even more natural-looking result. If you have an older Photoshop version that lacks this feature, choose Gaussian Blur instead.
On the Lens Blur dialog we used the above settings. Feel free to experiment though! However, make sure to leave Source set to None and Invert unselected. The Iris and Specular Highlights sliders only affect the characteristics of blurring. Intensity can be controlled using Radius.
Even closer to reality
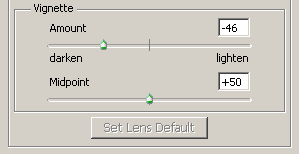
Tilt objectives usually leave a good deal of vignetting on the picture as they also use the edges of the lens. For an even more realistic effect, click Filter/Distort/Lens Correction. Under Vignette, you can darken the corners of the photo a little. Amount sets the intensity, while Midpoint controls the size of the unaffected area in the middle.
A realistic mock-up
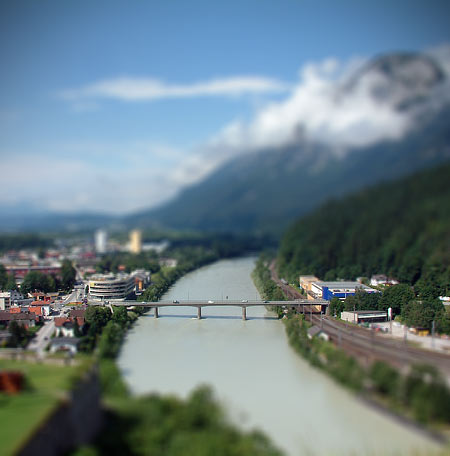
The low depth-of-focus left by the blurring really looks like as if you shot a mock-up town with macro lens. Foreground and background is blurred more than usually, and only the masked middle areas.