News | Articles | Books | Links |   Digiretus.hu |  Digiretus.ro| RSS
Photo review|2010.07.29.
Photoshop Tutorials|2010.07.11.
Lightroom|2010.06.30.
Review|2010.06.15.
Review|2010.06.12.

A portrait and the Parliament


Our review stream has reached the letter 'P', so for today, there's a portrait and the Parliament. There isn't anything more to connect the two, apart from Balázs Turay's thoughts.


Horizontal horizon in Photoshop CS5

level: Very easy


A new button for adjusting tilted images


What's new in Adobe Photoshop Lightroom 3


Improved noise filtering, automatic lens and perspective correction, and much more.


HonlPhoto flash accessories, part 3: color filters


How to shift and adjust colors?


HonlPhoto flash accessories, part 2: bounce cards and reflectors


From gobo to snoot.


Which photo editor do you often use?

Photoshop
GIMP
Photoshop elements
Paint Shop Pro
other software
nothing


Search this site


PS Tutorials|2007.10.11.

Horizontal horizon

level: easy


The photo is askew, but we boldly apply a simple and accurate remedy.


Free Photoshop Tutorials: Correction of white balance errors III.

Version: Adobe Photoshop CS


level: easy

One of the novelties of Photoshop CS was Photo Filter, which could imitate in a single step the color temperature filters used in traditional film photography. Sometimes it happens also with digital photos that white balance is off target and the colors of the picture are shifted towards yellow or blue. Photo Filter, mentioned above, is a quick and handy solution for this problem. Of course, users of pre-CS Photoshop versions don't need to fear either as they can easily create a similar color filter on a separate layer. We'll discuss this in another article some time, but for now, let's see the easier solution.

Advertisement
 

Printer-friendly version

Photoshop Tutorials - Correction of white balance errors III.


Photoshop Tutorials - Correction of white balance errors III.

1. Load the photo
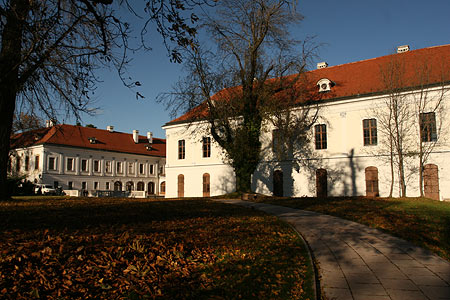
This picture looks yellowish indeed. A badly set white balance causes the colors to be warmer than needed. It does help the lingering autumn twilight feel, but we still want to see the original, somewhat colder colors again.

Photoshop Tutorials - Correction of white balance errors III.

2. Heaps of filters
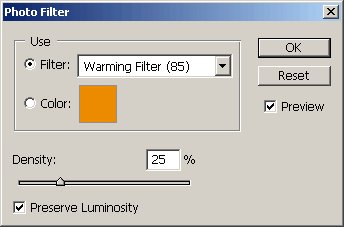
Click Image/Adjustments/Photo Filter. The above dialog is displayed. The Filter menu offers several color filter types used in film photography. Click the Color square to define a custom color. The Density slider specifies filter intensity (0 to 100%). Select Preserve Luminosity to leave lightness levels unchanged and modify only colors. Deselect it to produce a color cast according to the color of the chosen filter.


Photoshop Tutorials - Correction of white balance errors III.

3. Serve chilled
Our colors really need a bit of a chill, so you'd better select the Cooling filter.

Select the Cooling Filter you want from the Filter dropdown. In this example, we used the light blue filter #82. Adjust the Density slider until colors look natural. We decreased the default value of 25% to 15%. Make sure Preserve Luminosity is selected as you presumably don't want blue to dominate the photo.


Photoshop Tutorials - Correction of white balance errors III.

4. True colors
The picture is back to its original colors. The yellow veil is gone. If the picture is too blueish, apply the same procedure the other way around—select a Warming filter. All the other steps are identical.


Related Photoshop Tutorials

Correction of white balance errors I.
Correction of white balance errors II.

More Photoshop Tutorials


Impressum
| About us

© nEtural webdesign 2006.
All rights related to the free use of any pictures, sounds, written material and graphical elements published on the web site are reserved by the site owner. The owner's approval is required for the use of such published elements.