Photoshop Elements contains a special tool we haven’t yet introduced. It helps adjusting skin colors easily, so portrait photographers may find it an ideal tool.
Load the photo in Photoshop Elements

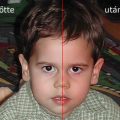
Something’s not right here. The picture above look too yellowish. The color veil dominates the picture and suppresses its real colors. We have already learnt how to deal with this in Photoshop Elements, so why repeat it? This time, we’ll choose a new method. As the picture is mostly of a portrait nature, let’s use a skin tone adjustment tool.
A purpose-built tool
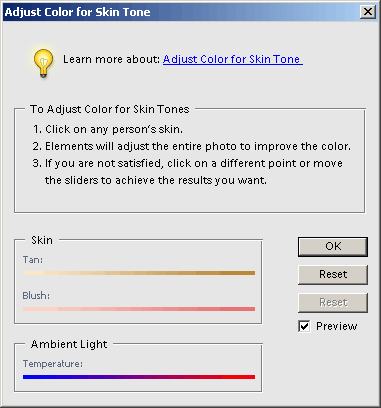
The tool in question can be activated under Enhance/Adjust Color/Adjust Color for Skin Tone. It displays the above dialog, with information ordered into a numbered list. The first tells you to click on some skin area to select the base skin color for Elements.
Base color and settings
For this selection, choose an appropriately homogeneous area without lots of wrinkles and shadows. Shadowed areas have colder colors and might shift color balance.
After clicking the desired area, you can already see the effect. The application will treat the selected surface as skin-colored, and other colors will be adjusted accordingly. If you don’t like the result, repeat. Try clicking different places on the skin surface until you get the colors you want.
After clicking, the sliders at the bottom of the window become active. They help fine-tuning the colors of the photo. The most important one is Temperature at the very bottom. Drag it to the left to make colors colder and to the right to make them warmer. Use this first to set the color balance of the picture and of skin, if needed. The two other sliders above can only refine skin tone. Tan lends a bit of suntan to the skin, when dragged to the right. Otherwise, it makes skin paler. Blush is pretty obvious. Drag it to the right for more reddish tones.
A cure for the yellows
And this tool can of course help not only against the yellows, but also waxy paleness, or a cold blueish tone. As you can see, the result is much more realistic than the original picture, and apart from the skin, other colors in the picture also look more natural.