At a first glance, the concept of masking may seem unearthly and inconceivable, but understanding it yields the knowledge of one of Photoshop’s most interesting and widely used editing method. It helps you work much more exactly on any picture area. A very often used masking method is Quick Mask. This article describes its basics.
But what is a mask?

It is indeed what it seems to be. Imagine a carnival mask—it helps to understand the significance of Photoshop’s masks. Its task is to cover up certain parts while leaving others exposed. Masking in Photoshop does the same with photos. However, in this case, “covering up” doesn’t mean making it invisible but untouched by editing. You could say the masked areas are protected, so editing only affects the unmasked parts of the photo.
So, masking is a selection of sorts. It enables you to select and freely transform the areas you want. One of the simplest and quickest varieties is Quick Mask. It is controlled by the two buttons at the bottom of Photoshop’s tools palette. The one on the left turns off, while the one on the right activates Quick Mask mode. You can also press Q to toggle this mode on and off.
In practice

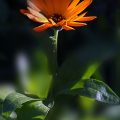
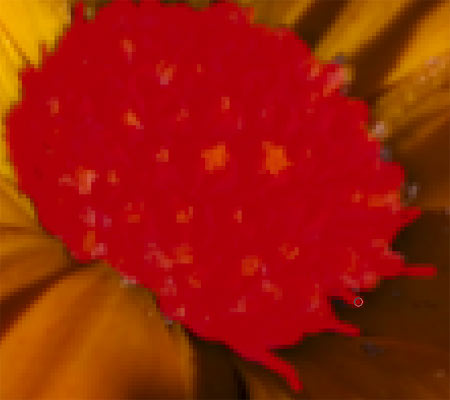
We’ll use the photo above to demonstrate how the tool works.
Suppose you only want to modify a part of the picture while leaving all other areas unchanged. The first requirement to this is an accurate selection. You need to select the area you want to change. You can also do this using a quick mask, but you’ll have to think backwards then: you’ll need to put a mask on the areas you DON’T want to be affected.
If you plan to give the petals another color and leave the middle of the flower unchanged, you have to mask the middle part to protect it from future changes.
All you have to do is use the Quick Mask button on the right (or press Q). Now you’re in Quick Mask mode, but you cannot see any changes on the screen.
Making the mask
The easiest way to creating a mask is to “paint it” on the picture. In Quick Mask mode, painting and erasing tools do not alter the picture visibly. All they affect now is the mask.
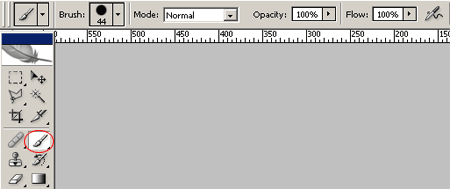
Select the paint brush tool, and specify a size and softness in the options bar. Opacity is very important when creating masks. Leaving it on 100% produces a wholly blocking mask, while setting a lower value will reduce the opacity of the mask, which means the changes will also affect the masked area, but to a lesser degree. For the sake of simplicity, we’ll use a 100% value for now.
Handiwork
Use the selected brush to paint to any area of the picture. If you paint over a complicated shape, you should change brush size—use smaller sizes when covering finer details. For more accurate work, zoom the image. If you mess up something with the mask, just press E to select an eraser, and delete the incorrect part. Basically, your dexterity’s the only limit you face. This method enables you to select a shape of any complexity.
Your brush leaves a semi-transparent, reddish layer on the image. This is the mask. It cannot be seen on the image, only in Quick Mask mode. The areas it covers will be protected from further editing.
Changing into a selection
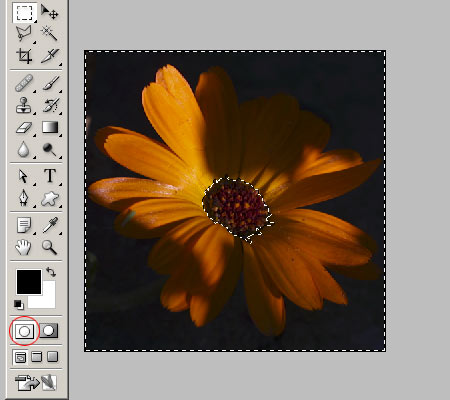
The mask is done, we meticulously painted over the middle part of the flower. But how can you change this into a selection? Simply indeed! If you’re done, just quit Quick Mask mode using the left Quick Mask button, or by pressing Q.
Now you’re back in standard editing mode, paint brushes and erasers once again affect the picture, but now it’s not the important thing for us—it is the selection which came into being when you switched back to this mode. The selection includes the whole picture, save for the areas covered by the mask. These will be omitted, which means they are exempt from editing. If you do want to edit the masked parts only, just right-click the selection and click Select Inverse from the context menu. We don’t need to do this, since the petals we want to recolor can be found in the selected area.
As you like

The following editing steps are optional. You can lighten the picture, adjust its contrast, paint on it a shape you want, or change its colors, as we planned originally. We used the Image/Adjustments/Channel Mixer feature to produce the result you can see above. You can see the color change affecting the whole of the picture, save for the masked area (black parts cannot be colored anyway).
Masking can not only be used for altering images, but also for cutting complicated shapes from the picture. Just paint them over in Quick Mask mode, switch back to editing, invert the selection, and voilá!—the masked object/person/whatever will be selected.