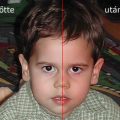
We’re not frightened by a few spots
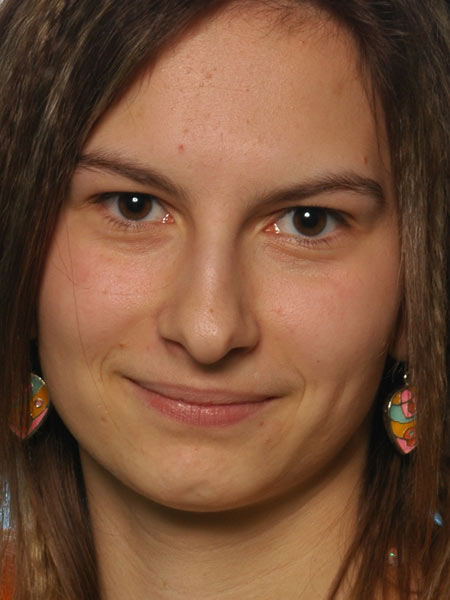
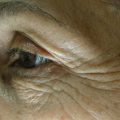
“There are a few spots and wrinkles visible in this picture. Would you kindly remove these skin defects?”
Sophie

It is not a critical step, but first we selected the problematic skin areas. The Elliptical Marquee Tool (press M) is perfect for this job. Keep Shift pressed while drawing circles around all the spots and other defects, and you’ll be ready in a couple of minutes.
You may want to blur the selection edges slightly so that the changes fit better to the unchanged image areas. To do so, we right-clicked one of the selected areas, selected the Feather command and specified a value of 2 pixels on the dialog which was displayed.
You can also hide selection borders if they interfere with your work by pressing Ctrl+H.
For the actual removal, we used the Spot Healing Brush (press J). This is a healing brush which, when configured properly, takes a sample from the surroundings of the painted area and fills it using this sample. In this case, it clones smooth skin surface over a spot—if you’re lucky.
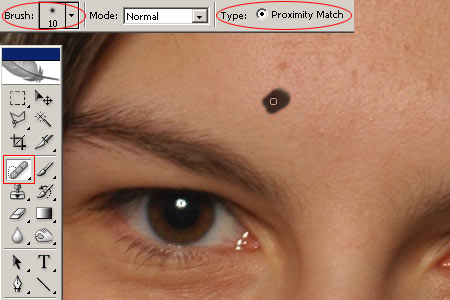
At the top of the window, we set a brush size of 10 pixels. You should use a relatively small brush so that fine skin structures work better. To set size, click the button next to Brush on the options bar. Diameter sets the size, while Hardness controls how blurred the brush edges are. Use a soft brush at a setting of 0% or something close. Under Type on the options bar, make sure Proximity Match is selected.
All that remains is to paint over the selected areas. As you release the mouse button, the grey painted areas are filled with smooth skin surface. If you’re unsatisfied with the result, paint again. Go through the selected problematic areas one by one.

We also found annoying the hair parts falling into the face. The twin of Spot Healing Brush, called Healing Brush (press J) was used for removal. This is another clone brush that fills the painted areas with samples taken from other picture parts, but it is not automatic—you have to specify the sample source location by Alt+left clicking. For hair removal, we took a sample from a nearby “parallel” skin area and painted over the hair with tiny brush strokes. As you release the mouse button, the painted area gets a color and brightness matching its surroundings, with the texture of the sampled part. When dealing with individual hairs, you should take samples from several different locations and work carefully. For more details about using Healing Brush, see this article. This is how we removed the smaller wrinkles, too. We used a size 14 brush with soft edges and the above settings.
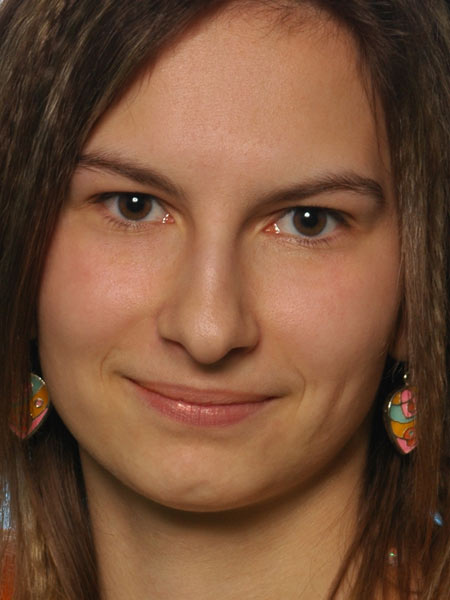
We also used the Healing Brush to remove the dark rings under the eyes. We sampled the skin surface under the eye sockets and painted larger areas at once. The Healing Brush can be used to adjust an unruly eyebrow, uneven facial features, or smaller misplaced shadows.
It is also useful to slightly lighten the eyeball, shadowed by eyelashes, but only in the shadowed parts. We used this procedure for the task. Our goal was a slight retouch, not producing a cover for Cosmopolitan. The face has to retain its original features, so take care with lightening. There’s no need for a very strong intervention, just some enhancement which goes by unnoticed by the viewer.
Although Sophie asked us to remove the wrinkles, we left some of them. The mimic wrinkles around the mouth relate strongly to facial character and the natural feel of the smile. Removing them would be too much, and if, on top of it all, you smooth out these areas, the chin bone becomes too emphatic. The overly smoothed skin also makes the face rounder. To avoid this, you should make the chin bone narrower, which is way beyond slight enhancements as it alters the shape of the face. We wanted to preserve the original facial character under all circumstances.
Next time we deal with reader requests, it’ll be time to do something to that chin .