A digital photographer must endure digital noise. However, this doesn’t mean you have to accept all kinds of noise in your photos. There is a variety called color noise. This you can remove even if you don’t have a dedicated menu command or effect in Photoshop.
This article offers a brief insight into the world of noise filtering. By modifying or enhancing the steps of the procedure according to your needs, you can develop your own, more effective methods.

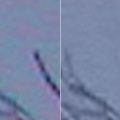
Red and green color noise can be easily seen in the picture, especially on the hand.

Click Image/Mode/Lab Color in the menu to switch from RGB Color to Lab Color. The Channels palette still contains 3 color channels, but they are very different from the others. The Lightness channel contains the lightness values of the picture. The graininess appearing on it is called “luminance noise“. Channels ‘a‘ and ‘b‘ are the color channels of the picture. You can reduce color noise by changing their values.

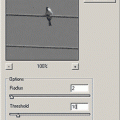
Choose color channel ‘a‘ and click Filter/Blur/Smart Blur. This filter takes edges into account and blurs them less than intermediate areas. Thus, it can be used well to filter noise appearing on homogeneous areas (as noise is more noticeable in such parts).
When specifying values, keep in mind that this solution slightly blurs colors. It doesn’t have any effect on the photo’s sharpness or details as those informations are stored in Lightness. However, you can easily make your colors dull. Use it with measure when processing photos with lots of bright colors and small details. We could still use it excessively in this photo, as it contains large objects and a huge amount of color noise. We have set Radius to 8.6 and Threshold to 45.8. Of course, use set Quality to High, and always keep Mode on Normal.
If you’re done, apply the same effect on color channel ‘b‘. We have used the same values but always choose them according to noise amount.
You can use Noise/Median along with Smart Blur, but in such a case use Median first, then do a Smart Blur or a vanilla Gaussian Blur on the same channel.
Click Image/Mode/RGB Color to switch back to RGB mode. Color noise has been blurred while we have retained most of the colors. As we said, the visible graininess is luminance noise. It can be removed with a similar method, and it will be discussed in a further tip.

Read the Removing color noise II. and the Removing color noise III. article.
Budai Petur