I can hear those affective souls hissing in disdain. Indeed, what comes next is more of manipulation than enhancement. We try to imitate gradient filters long used in film photography. These add a single-colored, soft color transition to your pictures. Most of the time they are used to enhance or add an extra color to the sky, and the grey gradient filter to reduce high brightness differences between the sky and the landscape. We try to make the grey sky look more exciting with a blue gradient, then put clouds on it with a procedure that doesn’t require any special drawing skills.
We conjure an effect similar to a blue gradient filter onto our dull grey sky, and try to create clouds on this “artificial” welkin.
First, click the indicated icon at the bottom of the Layers palette, then select the Gradient layer mode.
You can look at the preview to check the gradient color transition matching the current foreground color. By default, the transition is the other way around, but we want to touch up the sky, so select the Reverse check box below to reverse it. Most probably, the current color still can’t be called a proper one for sky—unless you are going for extreme effects—so you have to change it.
Click the Gradient color field to display this dialog:
First, select the color picker arrow on the left, then click the Color field below to display yet another dialog that enables you to choose the color you want for the sky. Choose a hue of light blue, and click OK.
Now select the color picker arrow on the right, and this time, select white. Now you have a transition running from light blue to transparent white. Click OK to close all the dialogs.

On the Layers palette, choose the Darken effect mode instead of Normal. You’re done with the gradient— you have created a blue gradient filter effect. Of course you can pick any color you like to emulate any other gradient filters available.
In the next step, we’ll be “drawing” clouds onto this newly produced blue sky. Of course, this is not a gradient filter effect anymore, but sheer manipulation, so it is up to you to decide whether you apply such a technique. If not, click Layer/Flatten Image to merge the layers, and save the image.
For the clouds, we have to continue the procedure from the Darken effect mode. Click Filter/Render/Clouds in the menu. It creates a soft, cloud-like pattern on the transition layer mask. This doesn’t make a very natural impression at first, but with a bit of tweaking, you can improve it. Click Image/Adjustments/Levels and set the arrow sliders as indicated below. Drag the black arrow on the left to the right, to about 1/3 of the range. Drag the white one to the left, somewhat past the center. If you have Preview selected, you can track the changes in the meantime. Now, carefully drag the middle grey arrow to the right and watch how the clouds change. If you have an approximately natural cloud pattern, click OK and then merge the layers with Layer/Flatten Image, and save the picture.
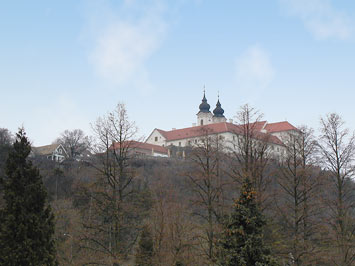
The final result: