Debarrelizer and Perspective
The Imaging Factory has a nice ring to its name among pluginprofessionals. This small developer company has released a good dozen of useful components that can augment your digital photo editing arsenal. We’ll introduce two of them now that can be used perfectly well with earlier Photoshop versions.
In Photoshop 7.0 and earlier versions, correcting the errors of cameras and objectives was in many aspects impossible or very complicated. Given the speed with which digital photography gained ground, Adobe saw that Photoshop users demand more photo correction tools. Newer CS versions already contain the tools for optical or software-related deficiencies like distortion, color defects, darkening of the image’s corners or incorrect white balance. The Imaging Factory’s plugins won’t bother you with flames and icicle-covered callouts but offer solutions to such basic problems. Users of earlier Photoshop versions are strongly advised to get those plugins for correction of digital photos. These gadgets also make their stand compared to the correction tools of newer versions as in many cases they offer more options or easier usage.
Debarrelizer
This plugin basically does what its name says: eliminates the barrel and cushion distortion of objectives. Besides, it has another important feature: it effectively removes chromatic aberration.

Spheric aberration is a distortion primarily occurring with wide-angle lenses. Straight lines in the picture bend towards the edges or the corners, as if the image surface was not planar but convex or concave. Debarrelizer’s Spheric Aberration section serves for eliminating this error (i.e., straightening the straight lines). The Correction Angle slider can be set from 1.0 to 180 degrees in steps of 0.1. This comes most handy when dealing with photos of buildings as bending walls and profiles are particularly noticeable.
Debarrelizer’s single disadvantage is that you have to rely on your eyes. The working pane features a small preview image but you don’t have a grid or guidelines that would make aligning the straight lines easier. All you have is the preview image to decide what settings you’ll apply. Aside from this, the feature is very quick and easy to use. It can be a real helper if the main aim is not accuracy.
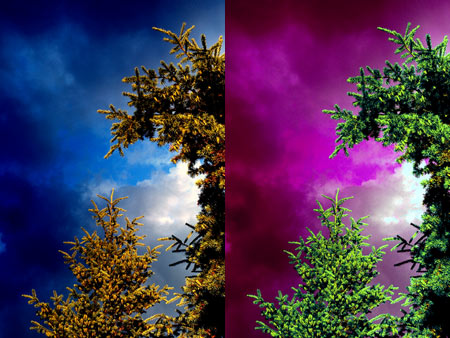
The other main section of the working pane is for repairing Chromatic Aberration. You have two sliders here. Scale Red Channel can be set between +/-10.000, in steps of .001 to control cyan/red aberration. Scale Blue Channel does the same for yellow/blue aberration. In the following picture you can see an aberrated image to the left and the same photo part treated with Scale Blue Channel to the right.

The Sampling section at the bottom of the dialog contains the settings for displaying the picture after modification. Scale To Fitspecifies how much the plugin should crop off the image. Off chops off much of the edges, while Auto leaves more areas. Width and Height sets the image size according to the sides or the top/bottom edge, respectively. Image ignores the shape of the new picture and fills the side areas outside the distorted edges with black. This way the image will look like a wind-blown sail, it barely reminds one of the rectangle it once was. If you want to preserve the original rectangle shape, select Edge Replication. This will fill the blank areas by replicating the edge pixels.

Sampling Type specifies the rendering algorithm used for the size change. Besides Photoshop’s well known Nearest Neighbor and Linear options, you can also choose Spline, which produces a better quality. It is recommended to select this setting.
You can save the settings in .PRM format by clicking Save. Click Load to load such a parameter set.
Perspective
Perspective distortion is not an error of the lens or the camera but an optical phenomenon that occurs rather often when using a wide-angle lens. Such optics have a stronger perspective effect, and thus a non-horizontal point of view makes buildings lie back. The wider the lens angle and the steeper the point of view, the stronger the effect.

First you have to specify the focal length of the lens the photo has been made with. The setting you select in the Focal Length menu will strongly affect the extent of the modification:
Custom – a user-defined custom value
Fish-eye – 8mm
Ultra wide – 16mm
Wide angle – 35mm
Normal – 50mm
Portrait – 75mm
Zoom – 105mm
Tele – 210mm
The Orientation section contains three sliders. Horizontal rotates the image to the left or right around an imaginary vertical axis. Vertical rotates the top and bottom of the picture around a horizontal axis. Rotation rotates the image around its center. You should use this slider if the photo is askew. All three values an be set between +/- 45 degrees in steps of 0.1. The left picture below shows a gate lying back—its parallel edges converge strongly. We have corrected this on the right-side photo.

The two possible options in the Positioning menu at the bottom also have a strong effect on correction. Off makes the photographer’s imaginary position the center of the rotation. Centered sets the rotation point to the middle of the picture’s plane, so that the image is rotated around itself.
Sampling Type once again contains the rendering algorithms from Nearest Neighbor (the simplest) to Spline (the best quality).
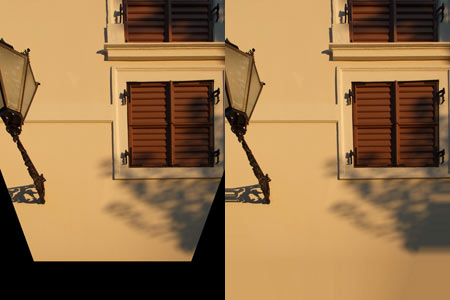
Edge Replication fill the blank areas left by rotating and skewing by replicating the edge pixels. The left picture shows a photo corrected without selecting Edge Replication. Because of the rotating, the lower areas are missing some information. These areas are filled with black. The right picture shows the same photo corrected with Edge Replication selected. The plugin has filled up the black areas by repeating the edge pixels.
Click Save to save the settings you specified for the Perspective plugin, and click Load to restore them, even to apply them to multiple photos.
We’ll continue from here next time. We still have two interesting plugins by The Imaging Factory to introduce. One corrects the darkening of the image’s corners, while the other repairs incorrect white balance.