Photoshop Tip: You’ll rarely rely on this technique in photo post-production as replacing a color with another can easily change the message of a picture, or, because of altering reality, can also attract the stain of manipulation. However, when used as a unique expressive device, it can lend a surprising appearance to your photos. In addition, color replacement can be carried out easily. So, let red be blue!
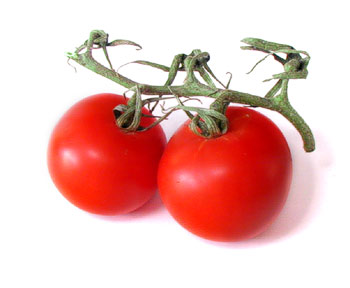
These tomatoes radiate a rich red (so much for alliterations), but we want them to turn blue instead.
The simplest solution is to click Image/Adjustments/Replace Color. The appearing dialog will look like this:

Let’s take a look at the settings.
Fuzziness can be set from 0 to 200 and controls which areas the color replacement will be applied to. The effect can be tracked on the preview image below. If you have Selection selected, the picture shows a black-and-white mask. Only white areas will be affected by the color change. If you have selected Image, you see the original picture. Choose Selection.
You can select the color you want to replace with an eyedropper tool. Click the desired color in the original image to select it. You can see the result on the preview picture: the color replacement will affect the areas that are now white. Set Fuzziness to a higher value if you want to include more areas in the change. You can also select the eyedropper marked with a + sign on the right side of the dialog. Clicking it on the original image will add more hues or new colors to the selection. Likewise, the eyedropper marked with a – sign will remove colors from the selection, thus reducing the selected area.
You can see three sliders and a color field under Transform. Hue specifies the color that will replace the original one you have selected. This color is shown in the field to the right. Saturation controls the strength of the color, while Lightness sets its lightness. The effects of these sliders can also be easily observed in the color field.
You want to replace the red tomato color with a blue, so first of all, click the red surface with the eyedropper.
As the image doesn’t contain loads of reddish colors, you can safely drag Fuzziness up to 200, and try setting Hue around -90 to -100. This will produce a blueish replacement. The small preview already gave something of a warning, but you can see on the original even better that some reddish hues haven’t changed, so the picture doesn’t look very realistic. Of course, blue tomatoes aren’t too realistic themselves, but the photo still needs some treatment.
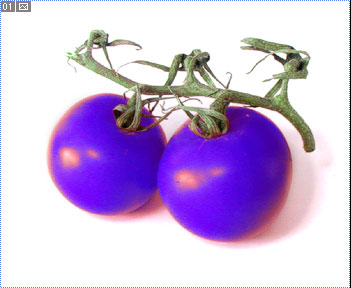
You have to include the reddish colors still left in the selection. Choose the eyedropper with the + sign and click one or more of the still reddish areas in the photo. You’ll instantly see the result.
The final image can be refined with the proper setting of Saturation and Lightness as needed.
When you’re finished, click OK and save the picture.