Nowadays, self-assured digital photographers don’t fear a bit of image noise. Fortunately, anyone can find suitable noise filtering software, if the relevant features of their camera won’t do the job all right. One of the most well known such applications is Neat Image, also available as a plugin for Photoshop (and other widely used photo editing programs). Albeit Photoshop‘s newer versions already contain a noise filtering feature, Neat Image and similar dedicated tools offer more settings, and likely a better and more accurate result. Despite this statement, we still introduce the plugin now with its simplified user interface.
After installation, click Filter/Neat Image/Reduce Noise in Photoshop. You’ll have to load a photo first, of course. The application window looks just the same as in the stand-alone version. Click Tools/Standard Mode to switch to the simplified interface.
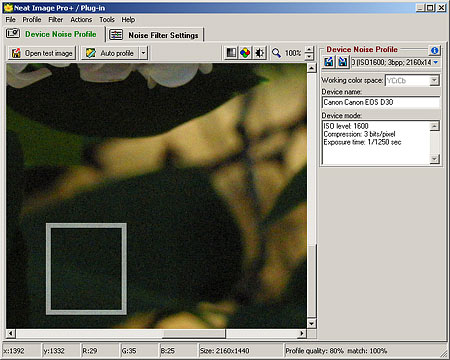
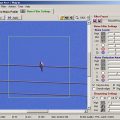
Neat Image basically consists of two main components, activated by clicking the tabs under the menu bar. Device Noise Profile attempts to assess the profile for the camera used and the photo’s noise level. Simply put, it produces a map of noise layout and extent. The other component, Noise Filter Settings, does the actual filtering and lets you specify the relevant settings.
A portrait of noise
There are two easy ways to produce a noise profile. You can open a test image done with an identical camera and film speed/sensitivity (Open Test Image), or apply the plugin’s Auto Profile feature to a homogeneous area in the current photo. Both relevant buttons are in the upper left corner of the window. You can also open a pre-defined noise profile for your camera. Click Profile/Open, or the first icon above the device info region in the upper right area. You can download profiles free of charge for numerous brands and models from the developer’s website.

The fastest of the mentioned options is Auto Profile. Click the button to have the application look for a homogeneous area in the picture, and set up the noise profile based on it. You can also select the area to use. You need to specify a homogeneous area of at least 64×64 pixels by dragging. If you fail to do so, a warning message appears. After successfully drawing the box, click Auto Profile. If you have taken more photographs with the same camera and in similar circumstances that also need noise filtering, save the profile by clicking Profile/Save As. This way, you won’t need to prepare profiles for those images, you can simply open the saved one instead.
Noise removal
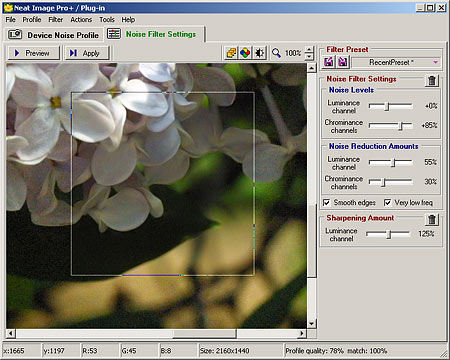
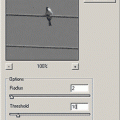
The next component can be invoked by clicking Noise Filter Settings. Most of the options can be specified using the sliders on the right. Above them, there are two icons again, this time in purple instead of blue. The first is for loading previously saved settings, and the second for saving the current ones. There are two Trash icons above the sliders. These reset the controls to their default values. The Preview and Apply buttons in the upper left corner are also important. Preview shows the effect of the current noise filter settings on a selected part of the picture. Simply click the button to have the application select an area (the middle of the image). You can also drag a selection rectangle in the picture. Make sure to zoom the photo to at least 100% before using the preview as it is needed to see noise and how well the removal works.
Apply executes the noise removal on the whole picture, using the current settings.
But let’s return to the sliders for now as the settings are not yet complete. You can set the noise level relative to the predefined profile in the Noise Levels region. That is, if you set both sliders to 0%, you specify a noise level exactly identical to the one in the profile. Negative values indicate a lower noise level, while positive values a higher one. Leave these sliders at 0% for now, you’ll still have the possibility to adjust them later.
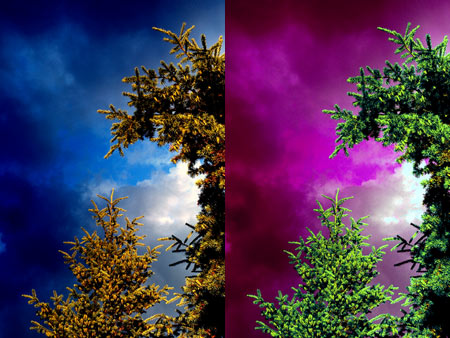
Speaking of sliders, Luminance Channel specifies the noise level for the luminance channel, while Chrominance Channel does the same for the color channel(s). As you can see, they deal with the two most important noise types, color and luminance noise. It is best to illustrate how they work. The left side of the picture below shows luminance noise, emphasized by sharpening. It can be observed in the form of monochrome grains that can decrease the sharpness of the picture to a significant extent. It is richly nourished by incorrectly executed sharpening, which can turn a weak graininess into a raging ash-storm. The right half of the picture shows color noise, a confetti torrent of single or multicolored dots. It ruins color hues, especially when backed by the strong noise filtering of digital cameras. It can also be strengthened by increasing saturation.

So we have identified our two primary foes, color and luminance noise. The sliders with the same names in the Noise Reduction Amounts region can be used to specify their removal strength. Default values are 60% and 100%. Use Preview to check the result of filtering in the selected area. Click Apply to finalize the procedure if you find the settings acceptable. If noise reduction looks too mild, raise the Noise Levels sliders first, and only increase Noise Reduction Amounts carefully afterwards, when needed. Click into the preview rectangle to display the original noise level so that you can compare it with the filtered result.
Three additional controls can be found below the sliders. They are also for finalizing the image’s appearance. Use Smooth Edges carefully as it also blurs small details. Its usage should be avoided when working with very detailed pictures (such as landscape photographs). Very Low Freq helps in filtering coarse, low-frequency noise. The bottom slider sets the extent of posterior sharpening on the luminance channel.
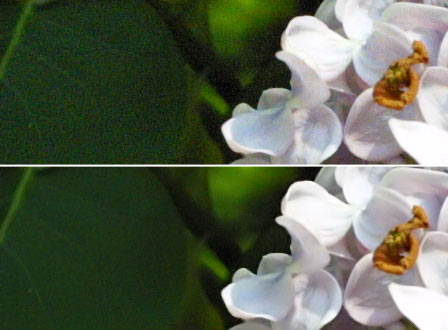
The upper part of the following photo is the original, while the lower one is the same piece filtered by Neat Image.
Next time we’ll look at Neat Image a little closer and get to know its advanced interface.