An additional problem with photos published on the Internet is to protect them from unauthorized usage. Of course one shouldn’t be paranoid about this, but given a certain situation, it is worthy to take some precautions so that the picture cannot be used so easily by others. The simplest method is to place a faint watermark in the picture, containing your logo, name or company name. This Photoshop tip explains how to conjure an extremely simple text watermark into a corner of a photo.
Open the photo you want to put the watermark in. Of course, this is usually done by clicking File/Open.
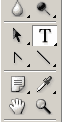
You’ll create an original inscription in the picture, so select the Type Tool from the left-side toolbar. You can also press T to do so. This tool enables you to write into the picture.
The tool settings can be seen just under the menu bar. These allow to specify font, font attributes (bold, italic, etc.), font size, and quality, or font smoothing.

Further important settings, such as text alignment or font color, cannot be seen in this picture.
Choose a font you like, and a size that is not too obtrusive. Pick a color that can be read in the picture and doesn’t ruin its color effects. It is recommended to pick white for darker colors or black for lighter ones. Double-click the color picker to choose the color you want.
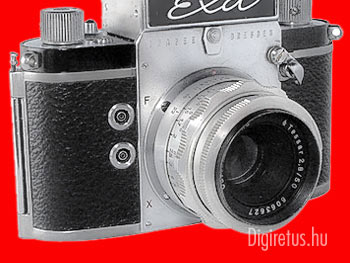
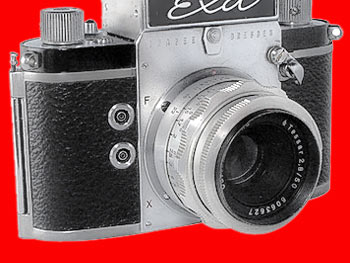
First of all, decide where you want to put the watermark. Choose an area where the inscription will be legible (that is, simple background) but make sure it touches the more important parts of the photo so that it cannot be simply cropped.
Then, click with the Type Tool on the area where you want to put the watermark, and simply type it. The application now functions as a very basic word processor. If the inscription is not in its proper place, select the Move Tool (press V), then click and drag the text to the place you like. Finer positioning can be achieved with the arrow keys.

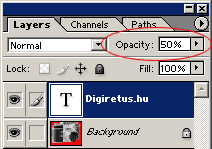
You can see on the Layers palette on the right that the text is on a new layer. This can be modified just like any other layers. In this case, we’ll be merging it into the photo after some paling. You need to decrease Opacity for this purpose. It makes the inscription more transparent, less dominant, decreases the damage it has on the general effect of the picture, but still reminds the viewer of the creator. Set Opacity according to taste. We have used a value of 50%.
Click Layer/Flatten Image or Layer/Merge Down to merge the layers, then File/Save…, Save as…, or Save for web to save the photos.