Our second PS Elements tip – us being that comfortable – has been “converted” to Elements from an earlier Photoshop article. In this area, the difference between the two applications is smaller than you’d think. You might even say the younger brother performs in sharpening just like the elder. So this is a repetition, which is the mother of all studies, as the ancient Romans said.
Load the photo in Photoshop Elements

After starting Photoshop Elements, click File/Open to open the photo from the location where you have copied it.
Sharpening with Unsharp Mask

You’ll find Unsharp Mask in the Filter/Sharpen menu. After clicking this menu item, a small window appears with the preview of the image in the upper left corner for checking the results of your actions in advance. Set zoom rate to 100% to see the photo in its original size. Make sure that Preview is selected in the upper right area. It is selected by default. You can also monitor the sharpening procedure outside the window, on the main picture.
At the bottom of the window you can see 3 sliders. Amount sets the sharpening value from 0 to 500%. Radius specifies the width of the sharpening relative to the detected edges. Lower values result in sharpening the tiny, finer details while higher ones apply it to the rougher, broader edges. The value can be set from 0 to 250 pixels.Threshold sets the limit under which the application decides that an area should be sharpened. The value can be set from 0 to 255 pixels. When set to 0, the sharpening effect will be applied to any area that can be detected as an edge. The higher the value, the smaller the actually sharpened area. You may find this a bit confusing at first, but you don’t need to learn the text by heart! Try the functions repeatedly, and after a while you will feel which value you should change.
In practice
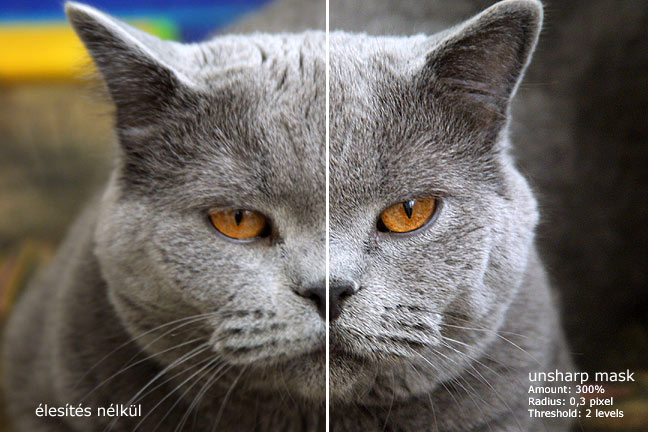
Let’s see an example.
You have loaded the portrait of your little favorite and opened the Unsharp Mask window. You can see that the fur appears in tiny, fine details in the picture. You want to emphasize these details more. Set Amount to 500% at first so that you can see the effect of sharpening in its wholeness. You will lower this value to refine the effect later. Leave Threshold at 0 to have the sharpening applied to the whole picture. Now try Radius! If you drag the slider towards higher values, you can easily see the result of the effect. As the image contains finer details, too high values cause it to “fall apart”: Unrealistic, rough edges appear, followed by enormous contrast. We only need to emphasize the finer details but keep the naturality of the photo.
In this case, the very fine Radius value of 0.3 leads to a result pleasing to the eye. 0.4 is already a bit excessive. It can be used as a rule of thumb that pictures containing many details can be sharpened nicely by using an Amountof 500% and a Radius of 0.3 or even 0.2. In this particular case you can keep 0.3 but reduce Amount to about 300%and Threshold to 2, as the aggressive, too light edges look disharmonious even at a Radius of 0.3. These settings can be generally used for photos of furry animals or, for example, landscapes. When dealing with even finer details, a Radius of 0.2 and an Amount of 400 to 500% may lead to a nicer result. Because of the silvery nature of the cat’s fur, a Radius of 0.3 is not very irritating. Generally, keep Threshold low, you may even leave it set to 0.
Keep in mind though, that sharpening smaller details may not only enhance the characteristics of the fur but also cause the appearance of small grains called noise. Your basic guideline for sharpening is: BE CAUTIOUS!
Roughin’ it up

If the image contains fewer details (as with a photo of a building or a human silhouette, where you don’t want to emphasize the small details) you may want to set Radius to 1 and leave Amount on a low setting of about 50 to 100%. This way, relatively broader edges, silhouettes will be sharpened but finer details and noise won’t.