You can use Image Size as always, but why would you, if there’s only one photo to resize and save for the Web? In addition, the following method doesn’t require you to do anything with your original. Just open it, and you can save it in the desired size in an instant. Of course you won’t have as many settings as with other resizing commands, but it does nicely for everyday usage. It is a bit forgotten, a bit obscure, so it is high time we pulled it to light again: the resizing feature of the Save for Web command.
Open the photo
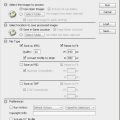
And save it instantly using the Save for Web dialog that also offers some resizing features. This option is available in the lower right corner, on the Image Size tab.
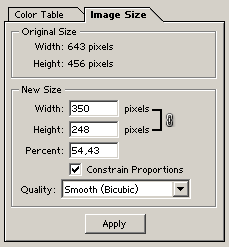
Original Size shows the starting size of the image in pixels. Width and Height are pretty obvious.
You can specify the size you want under New Size. It won’t affect the original photo you have loaded, just the copy you’ll save. The desired size can also be specified in pixels. If you select Constrain Proportions, the size values will change proportionately. This means when you change one, the other will change accordingly to preserve the size ratio of the picture. If you deselect the check box, you can specify any value you like in the two fields. Please note though that this will distort the photo.
The desired size can also be specified as a percentage in the Percent field. Quality sets the rendering mode for the picture. The options are Nearest Neighbor (worse quality) and Bicubic (better quality). Of course, compression ratio can be specified at the top of the dialog just like when saving any other image.
Click Apply to carry out the resizing. Finally, click Save at the top of the dialog.