“The color of the sky has been bleached, or perhaps it didn’t even have a color. Is there a way to make it blue? If so, how should I do it? Thanks for your help.”

The biggest problem with the sky here is that its whiteness peers from a tangle of twisted braches. The point of the whole operation is to select the white sky accurately. If you tried to select all the white areas along the branches, you wouldn’t finish in half of your life. Luckily, you have a few opportunities to create a mask out of a color channel.
Choosing the blue channel was obvious, since this contains the biggest contrast difference between the whiteness of the sky and the other areas which are now lacking any importance for us. First, create a copy of the Blue color channel as working with the original would affect the colors of the whole picture. Drag the blue channel’s bar upon the Create New Channel icon to create this new alpha channel.
2)
The alpha channel and its modifications do not affect the picture. It provides an excellent base for creating masks, to have the changes affect only those parts of the original image that aren’t covered by the mask. In this case, these are the white areas of the alpha channel.
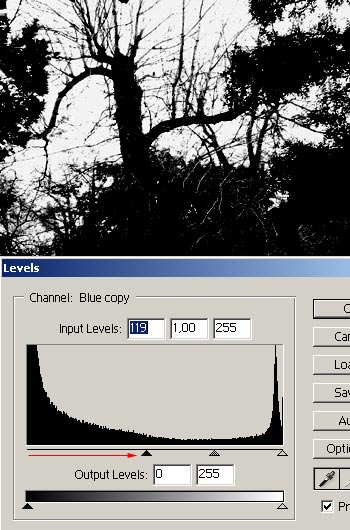
After selecting the new alpha channel, you need to change it only slightly, namely by further increasing contrast. Make the sky as light as possible, and the parts where you don’t need the blue of the sky as dark as possible. Separate the tangled branches from the whiteness of the sky!
We have used Image/Adjustments/Levels to increase contrast. We have dragged the arrow representing shadows to the right to make the alpha channel even darker and to make the difference between black branches and white sky even more emphatic. This is what we needed.
The black-and-white image we have just produced will make an excellent mask for the rest of the procedure. The changes we’ll make will leave the black areas unmodified while we can safely work with the white ones.
Hold Ctrl and click the alpha (mask) channel’s name to select only the white areas.
3)
Now, about the blue of the sky.
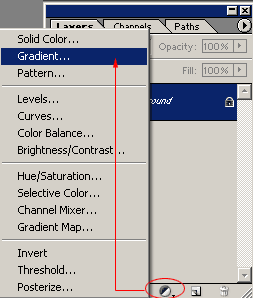
Click the RGB channel to display the original photo, with a slight difference: the white background precisely selected between the branches.
Switch to the Layers palette and click Create New Fill or Adjustment Layer at the bottom. Choose Gradient from the menu.
4)
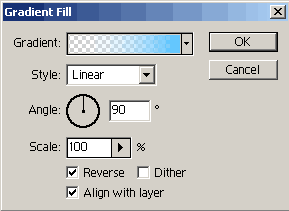
We have set the above values on the dialog. Click the transition in the Gradient field to display another dialog that enables you to select the appropriate color. We needed a light blue hue versus white.
5)
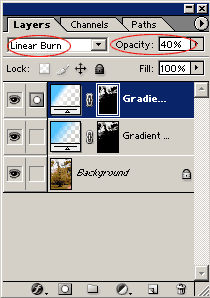
After committing the action, the result was pretty nice already, but we have refined it a bit further. Set Opacity of the Gradient layer to 40% and its blending mode to Linear Burn. Click Layer/Duplicate Layer for the Gradient layer. Double-click the small color field of the upper Gradient layer to return to the Gradient Fill settings explained in the previous section, and set the width of the transition to half of the previous value. Now we have another blue layer with a quicker transition on top of the previous one. This strengthens the blue tint in the upper areas of the sky, thus emulating the natural color transition caused by the atmosphere.
6)

The result is a powerful blue summer sky. The mask ensures that the blue transition doesn’t affect the branches and the verdant foliage, just the once white areas of the sky. Increase/decrease opacity of the two Gradient layers to strengthen/weaken the effect