This photoshop tip for post-processing portraits explains how to applying digital wrinkle remover, how to smooth in a face in photoshop.
Although the little boy in the picture doesn’t really need facial smoothing, he was a willing and grateful model, and thus we can illustrate nicely that the following actions can be used efficiently for almost any kind of portrait. In addition, if you have mastered the steps of our previous tip, you can make use of this one more easily since we’ll use a layer mask once again.
Although the little boy in the picture doesn’t really need facial smoothing, he was a willing and grateful model, and thus we can illustrate nicely that the following actions can be used efficiently for almost any kind of portrait.
Step 1:

Click Layer/Duplicate Layer to duplicate the initial layer.
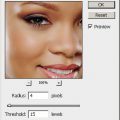
Step 2:
Click Filter/Noise/Dust&Scratches to soften the image. Set Radius between 3 to 10 as needed. The aim is to make the facial skin as soft as possible, but take care!
Leave Threshold at 0. If you want a really smooth skin, just like on overly touched-up magazine covers, you can apply an additional Gaussian Blur or Smart Blur.
In this step, the details apart from the face are not important so it doesn’t matter if the eyes or the hair also gets blurred. In the following steps, these details will be reset to their original condition while keeping the skin smooth.

Step 3:
Now, set the Opacity of the layers to a lower value, so that the original state of the picture comes through better and you can also see something of the skin’s structure. Blur makes the skin look to unnatural, so you will want to keep the original state visible, too. All in all, blur should dominate the effect so you should set Opacity at 60 to 70%. If you want a lesser smoothing, use an even lower value.
Next, create a layer mask with the icon below.

Step 4:
Te next steps are largely similar to those in our last description about using a layer mask. Press E to select the Eraser tool. Leave the default options (Brush, 100%, 100%) unchanged. Choose a middle-sized brush (or rather, an eraser) with a soft edge. You can erase holes into the upper layer so that the lower layer gets visible underneath. This way you create a kind of a mask for the layers.
Use the eraser on the areas containing details- the distinctive parts of the face, but leave untouched the larger skin areas that you wish to keep smooth. Thus, the parts you will want to erase are hair, eyebrows, the occasional beard and mustache, eyes, eyelashes, mouth, nostrils, ears, etc.
Once again, use style and common sense. These steps are difficult because you have to rely on your creativity. If there is visible clothing in the picture, erase it through, too, as the textile doesn’t look very good when blurred. You can see that by the painting (erasing), these areas regain their original state while skin remains smooth. You may want to change the brush size during the erasing work. For larger areas you can use a larger brush but be sure to choose a small one for tinier parts that require attention.
If you have messed up something (e.g. by erasing an area you shouldn’t have), press B to select a Brush tool, select a similar-sized brush and paint the changes back.

Step 5:
If you have finished erasing and repainting, click Layer/Flatten Image to merge the layers, and save your photo afterwards

Here you can read the second part of the article: Smoothing out faces in Photoshop Part2, and here the Part 3.