Another new feature inherited from Photoshop by Elements 5.0. At last, comprehensive lens error correction! It is not complete with color correction, but deals with geometric distortion, edge darkening and skewed perspective nevertheless. Of course, it needs your help.
Load the photo in Photoshop Elements
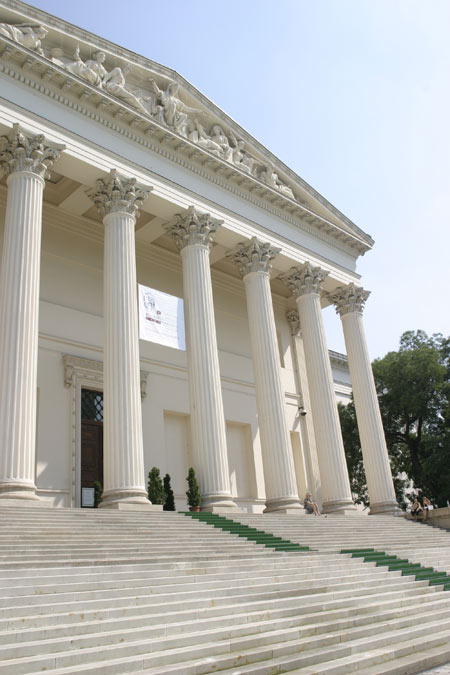
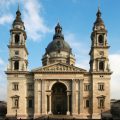
Good old Mr Pollack didn’t draw such an askew design for the National Museum, nor was it constructed this way. This phenomenon is called perspective distortion, caused mainly by wide-angle lenses when the plane of the building and that of the camera are not parallel—if you tilt the camera, that is. Among others, we’re seeking a remedy for this problem.
The remedy
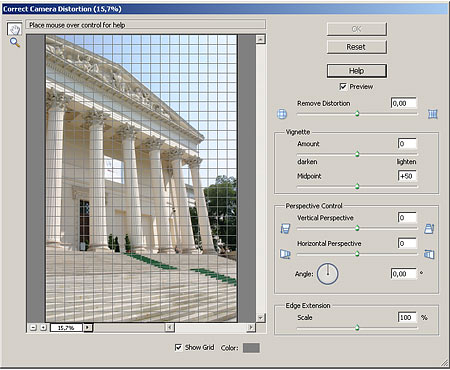
The solution is a new feature of Photoshop Elements 5.0, Filter/Correct Camera Distortion, capable of correcting three basic error types.
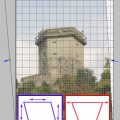
Remove Distortion: This slider cures one of the basic defects, geometric distortion. This usually shows in a slight or strong convexity/concavity, i.e. straight lines are curved in the picture. The sample image we have suffers less from this kind of defect. Drag the slider to the left to make the image look more convex and to the right to make it more concave. These actions can straighten out those curved lines. The grid drawn over the left preview image can help. You can click Show Grid at the bottom to toggle it on or off. The Color picker lets you choose the grid color.
Vignette: We have mentioned vignetting, i.e. the darkening of image corners, in multiple Photoshop tips. These two sliders are for correcting such darkening, or, for that matter, creating it. Drag Amount to the right to lighten the corners and to the left to darken them. Midpoint specifies the size of the area to be affected.
Perspective Control: This is the slider that can cure inclination. Vertical Perspective tilts the picture vertically, while Horizontal Perspective horizontally. Angle can rotate the photo around its midpoint. This can be useful for pictures taken with a tilted camera.
Edge Extension: This option can be used at the end of corrections. The edges of photos tilted back to normal become askew, and correction can simply cut edges off. The slider lets you extend the photo to fit the image window.
The settings
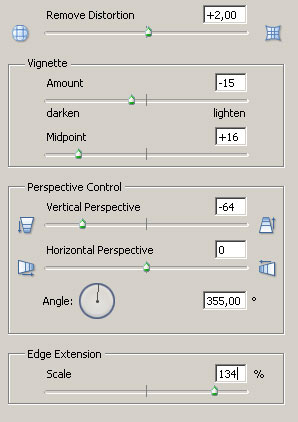
Let’s see the actual settings for the sample photo.
Geometric distortion was not too significant, so a value of +2 for Remove Distortion was enough. It could have even been ignored.
The sky was in fact too light in the upper right corner. Strictly speaking, it’s not vignetting, but it still takes a bit greying well. Set effect strength to -15 and size to +16. This produces a soft, long transition for the effect.
As to perspective correction, we have tilted the top of the backwardly inclined photo to the front with a value of -64, and haven’t touched the horizontal setting. We completed the procedure by adding a rotation of 355 degrees (that is, 5 degrees to the right).
The cropped edges were filled with an extension of 134%.
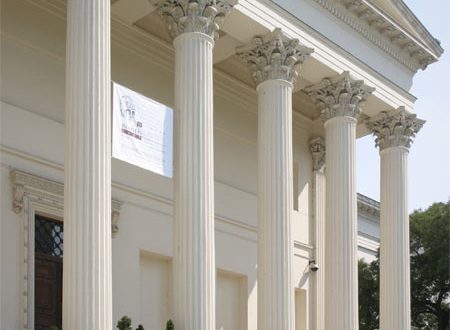
Straight as a die
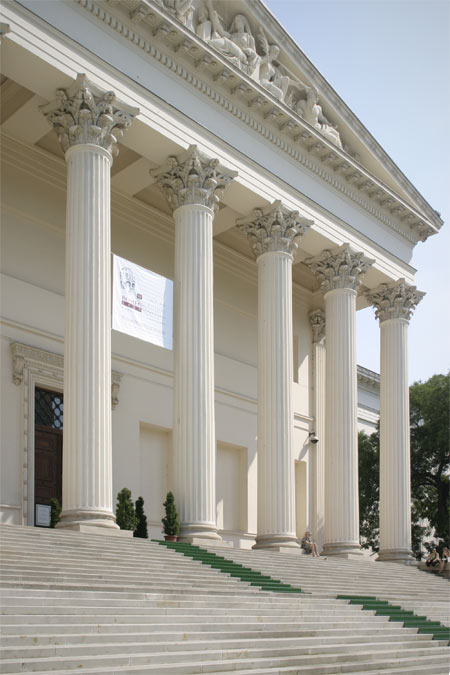
Just like its designer dreamt it. Like the builders constructed it. The enlargement of course made the angle narrower, but the building doesn’t recoil shyly anymore.